Alternating Flagstones
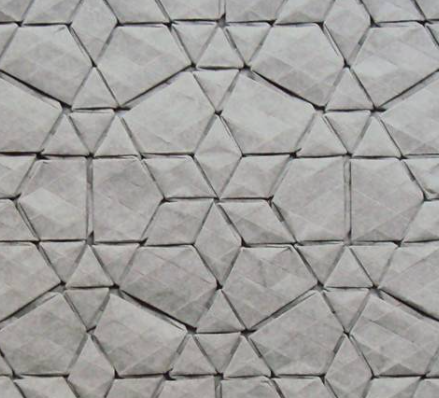
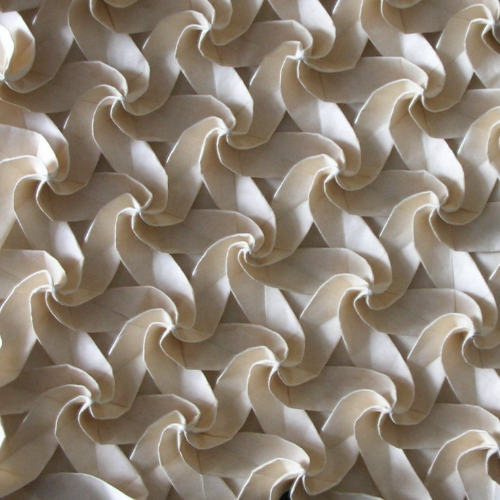
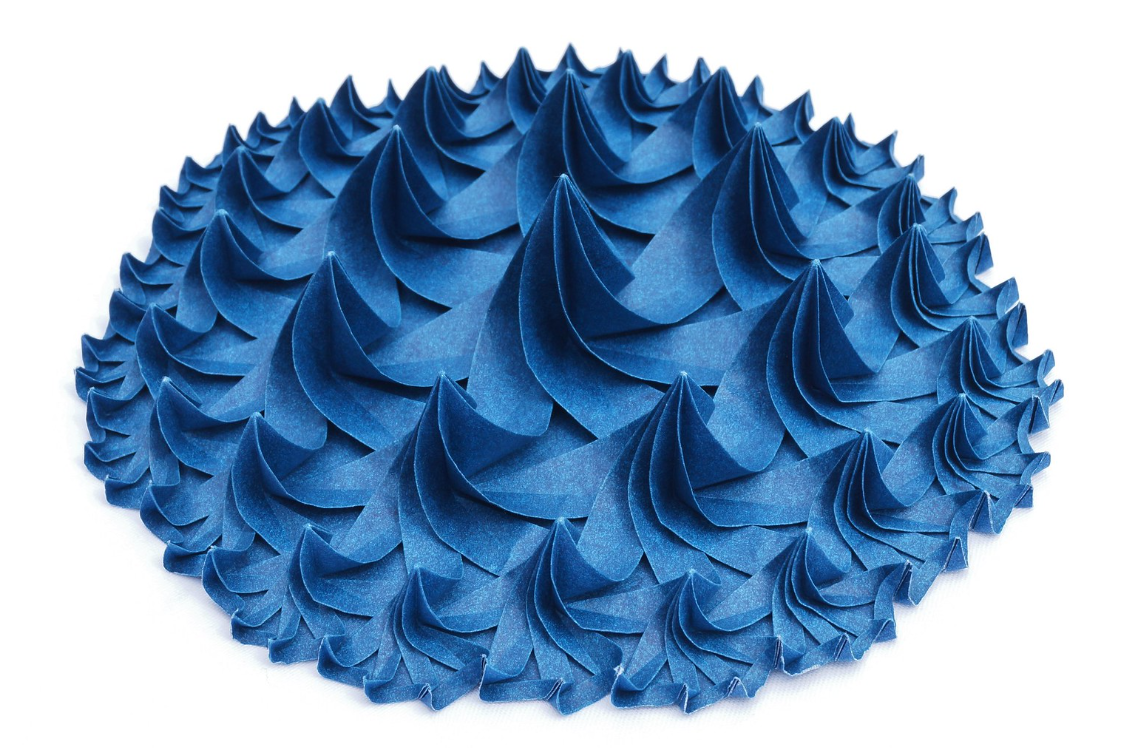
A flagstone tessellation is one which displays the underlying tiling as a pattern of flat, non-overlapping pieces on one of the sides of the folded model (left).
For alternating-flagstones, the other, non-flagstone, side is more interesting: the space between the flagstones is filled with a network of stars which are folded and curved into swirly hubs (centre and right).
More precisely, an alternating-flagstone crease pattern (CP) starts from a planar tiling G and turns every face into a smaller, rotated copy of itself — a flagstone — while preserving every original vertex as a star vertex of the CP. Adjacent flagstones are connected to each other with *ridge and to the stars by / radial creases. When folded, every flagstone lies flat and the stars become tightly twisted hubs.
This notebook demonstrates how to use the pipeline implemented in pleat.alternating_flagstones.
The pipeline is:
- Conway operator — apply
alternating_flagstone_graphto the input tiling to obtain the bare CP topology. - Structure — walk the result to identify flagstone faces, star vertices, and flagstone corners, and assign initial mountain / valley creases.
- Geometric optimization — solve for per-flagstone rotations / offsets and per-star positions so that the diagonal creases have the right lengths and the stars are isotropic.
- Boundary cleanup — extend the boundary so the outer outline closes flush with the flagstones (visual polish).
- Folded preview — cut out the twist centres and fold the wireframe to inspect the folded shape.
- Curved-fold subdivision — optionally subdivide ridge creases so their curving simulates correctly in Origami Simulator.
- Save to disk — package the CP, the underlying tiling, the folded preview, and plotter-ready SVGs into an output directory.
from matplotlib import pyplot as plt
from pleat import (
    alternating_flagstones,
    conway,
    example_graphs,
    example_tilesets,
    overlap,
)
from pleat.rendering import multi_show
1. The Conway operator
As for the shrink-rotate tessellations, the topology of the alternating-flagstone CP is obtained by applying a Conway operator to the input tiling.
pleat.conway.alternating_flagstone_graph(t) substitutes a small fundamental domain into every face of the input graph. The t parameter controls how far the flagstones shrink topologically (geometry will be optimized in the next step). Below we apply it to a square tiling and to a hexagonal tiling.
graphs, titles = [], []
for n in [4, 6]:
    G = example_graphs.from_tiles(example_tilesets.platonic(n), rings=2)
    G.recompute_lengths_and_angles()
    G_topo = conway.alternating_flagstone_graph(t=0.5)(G.copy(), delete_on_border=True)
    G_topo.recompute_lengths_and_angles()
    graphs.extend([G, G_topo])
    titles.extend([f'platonic({n})', f'alternating_flagstone_graph(t=0.5) on platonic({n})'])
multi_show(graphs, titles=titles, ncols=2, face_inset=0.04, render_vertices=False)

2. The structure: flagstones, stars, corners
build_structure applies the Conway operator and walks the result to assemble lookup tables identifying:
- flagstone faces — one per original face,
- star vertices — one per original vertex,
- flagstone corners — the "free" vertices on the perimeter of each flagstone, grouped by the star they orbit.
It also assigns initial mountain / valley labels (mountain on the ridge creases adjacent to each flagstone, valley elsewhere).
For the rest of this notebook we use a more elaborate base graph — the dual of a hyperbolic {7, 3} tiling, projected to a Euclidean square via convert_to_euclidean() and rescaled via normalize_edge_lengths().
# We use the dual of (7,3) instead of directly (3, 7) as we want a vertex at the center of the model.
G = example_graphs.from_tiles(example_tilesets.curved_platonic(7, 3), rings=3)
G = conway.dual_graph()(G)
G.convert_to_euclidean()
G.join_order_2_boundary_vertices()
G.normalize_edge_lengths()
G.recompute_lengths_and_angles()

structure = alternating_flagstones.build_structure(G, t=0.5)

# colourise the result: flagstones blue, stars white
for f in structure.CP.faces.difference(structure.flagstone_faces):
    f['color_key'] = (0.95, 0.95, 1)
for v in structure.star_vertices:
    v['color_key'] = (0, 1, 0)

multi_show(
    [G, structure.CP],
    titles=['dual({7,3})', 'alternating-flagstone CP (flagstones blue, stars white)'],
    render_faces=True, render_vertices=True, face_inset=0,
)

3. Geometric optimization
The bare CP is topologically correct but geometrically distorted: most diagonal ridge creases connecting the flagstones are too short or too long, and the radial arms around each star have different lengths. optimize_alternating_flagstone treats every flagstone as a rigid body (rotation + offset, plus a single shared scale) and minimizes
$$L = \sum_{\text{ridge edges}} \big(\|\text{diag}_i\| - \|\text{target}_i\|\big)^2 + \sum_{\text{stars}} \sum_{\text{arm}} \big(\|\text{arm}\| - \overline{\|\text{arm}\|}\big)^2$$
via plain gradient descent with momentum. The function requires the optional torch extra (uv pip install -e ".[torch]").
CP_before = structure.CP.copy()

metric_before = alternating_flagstones.connection_length_metric(structure)
print('before:', metric_before['summary'])

loss_curve = alternating_flagstones.optimize_alternating_flagstone(
    structure,
    n_steps=1000,
    progress=True,
    initial_scale=0.4,
)

metric_after = alternating_flagstones.connection_length_metric(structure)
print('after :', metric_after['summary'])

multi_show(
    [CP_before, structure.CP],
    titles=['before optimization', 'after optimization'],
    render_faces=True, render_vertices=False, line_width="30%", face_inset=0,
)

fig, ax = plt.subplots()
ax.plot(loss_curve)
ax.set_yscale('log')
ax.set_xlabel('optimization step')
ax.set_ylabel('loss')
ax.legend()
plt.show()
before: Maximum relative error in connection length is 22.25%.
Maximum mismatch between angles is 18.32°.
after : Maximum relative error in connection length is 0.00%.
Maximum mismatch between angles is 0.00°.

/tmp/ipykernel_3505/2805123035.py:27: UserWarning: No artists with labels found to put in legend.  Note that artists whose label start with an underscore are ignored when legend() is called with no argument.
  ax.legend()

4. Boundary cleanup
extend_border is a finishing step: it mirror-reflects the outermost ridge across each border edge, so the CP's outline becomes somewhat more round. The result has no border with less zig-zags. Typically, this optional step makes the incomplete stars on the border nicer in the folded model.
CP_cleaned = alternating_flagstones.extend_border(structure.CP)

# color the new faces consistently
for f in CP_cleaned.faces:
    if 'pre_conway' not in f:  # this selects all non-flagstone faces
        f['color_key'] = (0.95, 0.95, 1)

multi_show(
    [structure.CP, CP_cleaned],
    titles=['before extend_border', 'after extend_border'],
    render_faces=True, render_vertices=False, line_width=0.02, face_inset=0,
)

5. Folded preview
Alternating flagstones are not flat-foldable, as the stars are curved and point in the third dimension. We can still get some idea of the folded shape, in particular how thick the connections between the stars are and whether there are overlaps which would prevent the model from folding properly.
Two steps are needed to generate this flat-folded preview:
cut_twist_centresremoves a small polygon around every star vertex. The stars are topologically degenerate (every ridge meets at a single point), so they need to become real holes before the model can fold flat.overlap.fold_wireframefolds a CP in place by mirroring alternating faces about their shared edges, giving a clean wireframe of the folded shape. (One can also find a valid face order using for a slightly more realistic preview withoverlap.fold_complete— that is currently out of scope for this notebook.)
cut = alternating_flagstones.cut_twist_centres(structure, inset=-0.01)

wireframe = cut.copy()
overlap.fold_wireframe(wireframe)
for f in wireframe.faces:
    f.attributes.pop('color_key', None)

multi_show(
    [cut, wireframe],
    titles=['CP with twist centres cut', 'folded wireframe'],
    render_faces=True, render_edges=True, render_vertices=False, line_width=0.01,
)

6. Curved-fold subdivision (Origami Simulator)
Each ridge crease, when folded, ought to trace a curved arc. subdivide_ridges_for_curved_fold replaces every ridge with n short straight edges chosen so that the polyline approximates that arc. The result could in principle be folded correctly in Origami Simulator, however in practice it oftentimes struggles. Assigning correct small fold angles to these extra subdividing creases could be a way to fix this in the future.
from pleat.origami_simulator import origami_simulator_button


subdivided = alternating_flagstones.subdivide_ridges_for_curved_fold(CP_cleaned, n_subdivisions=5)

multi_show(
    [CP_cleaned, subdivided],
    titles=['straight ridges', 'subdivided ridges (5 segments)'],
    render_faces=False, render_vertices=False, line_width=0.01,
)

origami_simulator_button(CP_cleaned, title="Load Origami Simulator with straight ridges")
origami_simulator_button(subdivided, title="Load Origami Simulator with subdivided ridges")

7. Saving everything to disk
overlap.save_results packages the CP, the underlying tiling (which is technically one side of the folded state), the back-lit flat-folded preview, and a set of plotter-ready SVGs for the CP, its interior, and its boundary into a single output directory.
result = {
    'folded_state': wireframe,
    'CP': CP_cleaned,
    'folded_view_top': structure.original,
    'CP_for_origami_simulator': subdivided,
}

import tempfile, os
tempdir =  tempfile.TemporaryDirectory()
out_path = os.path.join(tempdir.name, 'alternating_flagstone_results')

overlap.save_results(result, path=out_path, bbox=(20, 20))
print('produced files:')
for name in sorted(os.listdir(out_path)):
    print(' ', name)

tempdir.cleanup()
produced files:
  CP.fold
  CP.heg
  CP.png
  CP.svg
  CP_for_origami_simulator.fold
  CP_for_origami_simulator.heg
  CP_for_origami_simulator.png
  CP_for_origami_simulator.svg
  backlit.png
  backlit.svg
  cp_for_cutting.svg
  cp_for_cutting_borders.svg
  cp_for_cutting_interior.svg
  info.txt
  top.png
  top.svg